Wednesday, October 30, 2013

Keurig Vue Giveaway


Organized and Hosted By: Out of the Bags 


Prize: 1 Keurig Vue 600 with Vue Pack


Event Dates: November 11 to November 30


Open to U.S Only 


Top Referrer will receive a free Co-Host spot. 


Requirements to participate:


Limit 2 blogs per person


Link Announcement or pay $5


Promote at least 3x times a week.


Signup Here

Tuesday, October 29, 2013

DIY Christmas Ornaments - Take 1


I really wanted to have my hand at some DIY Ornaments - I LOVED the old world look of them, and the twine I think really brought it together. Here is a quick tutorial on the first few that I did - I labled this entry "Take 1" because I will be trying a few other techniques in the next few weeks or so!


I bought this box of glass ornaments from the thrift store for 1.00 There were a few ornaments missing and they didn't have hooks, but they were perfect for my practice ornaments!!


First thing I did was figure out what paper I wanted to use - I had two different types to try - one was a sheet of regular paper (the one with the music notes) and the other was a heavy "tissue" type paper.
 
I used my paper cutter to cut some strips out, and using my trusty mod poge, I slathered on the stuff, and then randomly put the strips of paper on.
 
I added strips until the entire bulb was covered. With gentle hands, I rolled the ball making sure all the paper was nice and tight against the bulb and there were no rough edges.


Once the paper was on, I let it dry slightly, then prepared it for the sparkle-y glitter!! I used a larger flaky iridescent glitter to give it a whimsical snow-y Christmas feel!
 

I propped it on a candle stick to dry.....


Once that was done, I sprayed a light layer of CLEAR sealant (to seal in the sparkles!!) and I got out my little paper tags, used the hole punch and threaded it with twine, and threaded through the top of the bulb.


For the most part, they came out ok, but I wasn't 100% happy with the way they finished...


Stay tuned for Christmas Ornaments Take 2!

Tuesday, October 22, 2013

DIY - Dog "Envelope" bed - Or, Dog beds with Blankets Attached


We have two little puppies (well, they are grown now, pretty much) named Charlie and Lucy. They are both full of an insane amount of energy, and at the end of the day, like any good dog, they love to sleep hard.

However, this usually means they sleep in the bed with me and Hubby.

Which really means, they like to sleep with ME, at/on my feet, under the blankets. It gets very uncomfortable and hot and annoying when they want to growl at me when I move them lol...

Anyway, I knew that there had to be a type of dog bed that I could make that would be an awesome place for the dogs to sleep, and also have a blanket for them to bury and snuggle into, without coming apart. I found a few tutorials online, and from their adaptations, I created my own DIY - Here is whatcha need!


FOR TWO DOG BEDS

3 yards fleece (I got this awesome brown fleece on sale for 2.86 a yard, plus 10% off!!)
sewing machine
Sewing notions (pins, scissors and thread)


I have included some pictures of my drawing of how to assemble, but I will do a step by step as well to hopefully help with the visual!

1. Open up one yard of fleece, right side up. using long pins, mark where the fold will be from the left and the right (this is the size that the pillow will be)


2. With the half yard, open LONG WAY and pin in place (using folds) to fit within the markings of the folds (I did the top of the blanket, where the dog goes in, a few inches below the top marking) - you can sort of see the folds here


3. Once the sides and bottom are pinned in place, sew around the edge of the "blanket" part

4. Fold over and pin the left side, careful not to "catch" the blanket part in the seam - sew seams
4. Fold over and pin the right side - sew seams
4a: ***If you are experienced in sewing, you can fold over both sides, pin and sew at once***

5. Turn right side out - you will have the "blanket" part on one side, and the other will have a slip cover back, where you insert 2 standard pillows


 Here is Lucy sniffing out her new bed...


Here are my graphics (visuals) for you to follow if you need them:


DIY Sugar Scrub - Yummy!!


I LOVE sugar scrubs, especially the ones from Bath and Body works - I love them.

But I do not love the 16.00 price tag, so I usually only get one a few times a year and use it very sparingly!

I did some research and found a few recipes for DIY sugar scrubs at home, so here is one I did last week - I am going to try with white table sugar this week and see if there is a big difference, but for this one, I LOVE the coarseness of the Brown Sugar and the smell is soooo amazing its like baking in your shower!!


Here is what you need:

1 cup of Olive Oil (regular is best, but Virgin or Extra Virgin is Ok)
1 cup of Coconut Oil
2 cups of dark brown sugar (depends on how "wet" or "dry" you want your scrub)
2 tablespoons of extract flavor/scent of your choice (I used peppermint)


melt about 1 cup of the coconut oil in the microwave for about 30 seconds - it will turn clear and look like Olive Oil.

Mix the melted coconut Oil and the olive oil into the brown sugar.


 Add in the flavor (peppermint) - about 2 tablespoons - and mix well.

Put into decorative dish or jar and your done!!


The coconut oil will "harden" and rise to the top in-between showers - this is fine, as the hot steam and water around the jar in the shower will re-melt it and re-incorporate into the scrub.

This stuff made my skin feel amazing!! Just be careful because it will make your tub/shower stall slippery, so make sure to rinse it out well before the next person gets in!


DIY Harry Potter Robe for Jackson


So for Jackson's first Halloween, he is going to be Harry Potter. Hubby is going to be Hagrid and I am going to be professor Trewalney.

We like Harry Potter in my house :-)

I did not want to spend 12.95 on a pattern for Jack for that ONE element of a robe - I knew that surely I would be able to find something online and it really couldn't be THAT hard to do without a pattern.


I did a few internet searched and found variations of how to make the robe, but the one I liked most was this one, which, coincidently, did have a rough pattern that I was able to adapt. Here is the pattern I used:


(you can also link to her site here. )

I taped a few pages of white copy paper together, and freehand, traced the pattern, then cut out. I tried to estimate the size for jack, and overall, the end project was pretty close! (but more on that later!)


The hood ended up being a lot smaller than I thought, so I would def. say try increasing this a bit - the hood looks nice (on my version) but def. not functional!

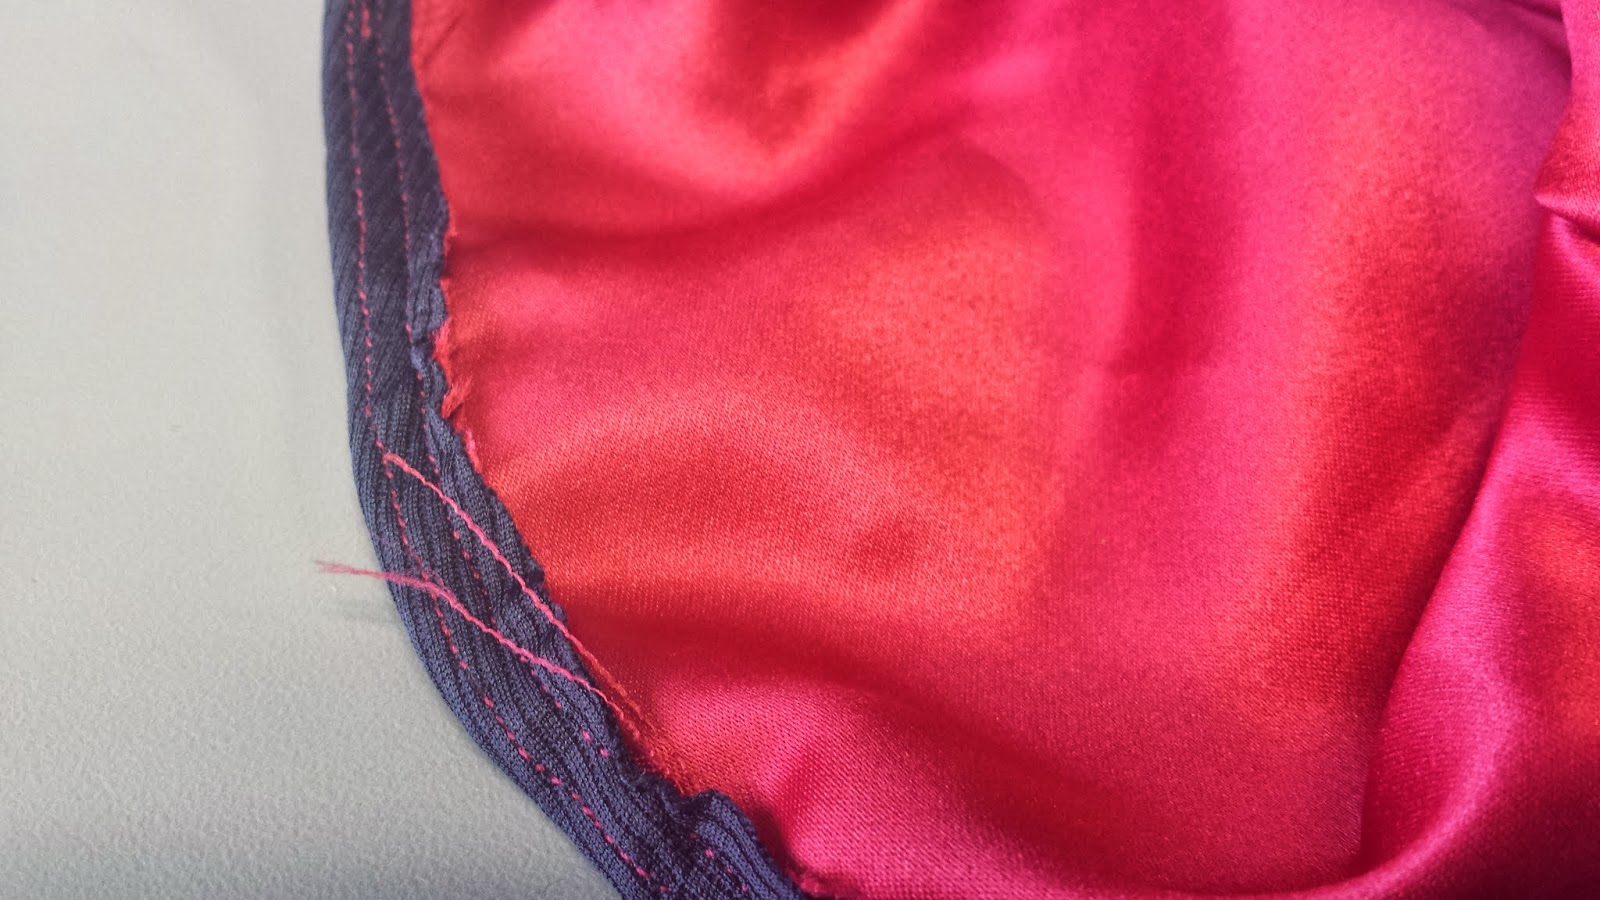
I did not use the "hood lining" because I could not figure out how to measure it out, so instead, I did a COMPLEATE lining - so basically I cut everything out in the black, then everything out in the red. I had left over Red Satin from a previous project, so I only needed to buy the black fabric - worked out great!!

If you have a good sense of sewing, this pattern is easy enough to not really need directions. If you need help, click on the link above and follow some of the directions from the site to get the basic idea.

For me, since I free handed the pattern, I realized when I went to attach the sleeves, that I needed FOUR cuts of each the black and the red - I'm not sure where I messed up my measuring, but I just sewed the two sides together, then pinned to the armhole, sewed and it was fine - a little jagged on the overall outside seam, but really, he won't notice! :-)

Once I made each "robe" (The red for the lining and the black for the outer) I placed them right sides together, and sewed around the edges, then turned right side out, pressing the seams down.


My sleeves were a toughie, and because I was being impatient, I just did a quick hem to the inside.


Once that was done, I flipped the bottom of the robe to be right sides together, sewed and then returned to right-side out, then did a small stich to close up the hole.

I have a patch I need to print onto Iron On transfer paper and attach to the right as well, to really give it some "authenticity"!

Overall, this was a good pattern and for me, not using a "real" pattern and free handing it, I think I did pretty well!! Please let me know if you have any questions on it!!


Tuesday, October 15, 2013

Chicken and Spinach Pizza - Delish!


My husband is a HUGE pizza fan, and so am I, but we do try and eat healthy when we can. We have also tried to cut back on eating out because its not good for us really, or our wallets.

So one of my planned menu meals for this week is white pizza - an awesome combo of chicken, feta, spinach, onions, garlic....mmm....really yummy!!


Shopping List:

Crust (either home made or bought)
2 chicken breasts, thawed and cubed (you can marinate if you want)
1/2 bag or a large bunch of loose leaf/fresh spinach (you can use frozen if you want)
10-12  cut rings of onion, then cut in half
1 clove of garlic, sliced thin
1/2 block low-fat cream cheese
1/3 cup low-fat ranch dressing
1/2 cup feta cheese
1/2 cup PLUS additional 1 cup shredded low-fat mozzarella or "pizza" cheese
1/2 cup Alfredo sauce
touch of oregano and basil, salt and pepper (put as much/little as you want)


  • Pre-heat oven according to your crust directions (350-450 is about the right temp).
  • In a mixer, mix cream cheese, ranch, feta, 1/2 c. of the shredded cheese, Alfredo sauce and a pinch of the oregano and basil. Set aside.


    • In large skillet, sauté the onion slices and garlic until cooked through and almost golden brown (4-6 minutes)

    • Add cubed chicken, a pinch of the salt and pepper and cook thoroughly, until no longer pink.

    • While chicken is cooking prepare the crust, and put a nice layer of the white sauce on, spreading evenly.
    • When chicken is cooked all the way through, mix in spinach a few handfuls at a time, cooking until just wilted. If you cook it down too much, the spinach pretty much disappears!
    • Mix everything in the pan together, and then spread evenly into the crust, on top of the white sauce - if you had extra sauce, you can add a dollop or two around.
    • Add the remaining cup of cheese to the top before putting into the pre-heated oven, usually about 12-15 minutes depending on how you want your crust...


    • After its baked and the cheese is nice and gooey, slice up and serve with whatever it is you eat pizza with! (we use ranch!)

    • In hindsight, we think that a nice layer of chopped crispy bacon would have given it a nice pop, but we are, after all, trying to eat healthy!!

    Enjoy!!


    Monday, October 14, 2013

    15 Minute Beef and Broccoli - Tastes like the real thing!


    I'm sorry I only have one picture of this, but I didn't think of taking the step by step pictures until after I took this one and posted to my Facebook. But, it does show how YUMMY this really is!! Taste like carry-out - even got the approval of a 15 year old!!

    PS: The left overs made great baby food for Jackson!!


    Ingredients:


  • 1 1/2 tablespoons flour
  • 1/4 teaspoon salt
  • 1/4 teaspoon black pepper
  •  1/2 teaspoon crushed garlic
  •  1/4 teaspoon crushed red pepper
  •  1/2 teaspoon beef seasoning (seriously, just use whatever "meat" seasoning you might have)
  • 3/4 pound beef cubes, sliced thin, maybe about 1/8 inch
  • 6 tablespoons vegetable oil
  • 10 ounces frozen broccoli florets
  • 3 tablespoons soy sauce
  • 1/3 cup water
  • 1 pouch of 90 second microwave rice

  •   
    1. Toss together flour, salt, pepper, and beef in a bowl until meat is coated (or use a large Ziploc baggie!)           
    2. Heat 2-3 tablespoons oil in large skillet over moderately high heat until hot but not smoking, then stir-fry beef until just cooked through, about 1-2 minutes (or just brown on the outside). Transfer with a slotted spoon to another bowl and keep warm, loosely covered with foil.
    3. Add remaining 2-3 tablespoons oil to skillet along with frozen broccoli and garlic, pepper flakes, beef seasoning and stir-fry over moderately high heat until broccoli is cooked and tender, about 7-9 minutes.
    4. While this is cooking, heat up the 90 second Rice in microwave (I used vegetable flavor).  
    5. Add soy sauce to water and bring to a quick boil, and then add to the broccoli. Return meat to skillet and mix everything together, until sauce is thickened, about 2 minutes.
    6. Serve in bowl, rice first, then beef and broccoli. Top with sesame seeds if you have some on hand for a quick pretty garnish.

    Lean Turkey (Ball) Subs!!


    There are two ways to do these:

    The SHM (Suzie homemaker way)
    The Easy Way

    I won't hate you for doing either!!


    For these (I won't lie!) I did it The Easy way and used bagged Turkey Balls (why does that sound so dirty??) that were low in fat and calories - combined with a reduced salt jarred sauce, low-fat shredded cheese and whole grain rolls, these could be considered healthy (But I'm not a dietician and I have no idea the caloric count - but I assume its better than the regular beef meatballs).


    For those who want to do it the SHM way, here is a GREAT meatball recipe I've used in the past and tastes fantastic! (this is posted at the bottom!).

    Anyway, for these shown above, I opened the bag of frozen Turkey Balls and put them in a medium sauce pan with my yummy spicy tomato sauce, and simmered on low for about 2 hours - I really wanted the good flavors to get into the meatballs!


    When the meatballs were about done, I preheated my oven to about 350, and got out my rolls - I usually get the rolls that ARE NOT PRECUT because I like to hollow them out like a log ship -


    ...This helps the meatballs not fall out, keeps the sauce in and the melty cheese I add in doesn't seep out!!

    Then I put a bunch of shredded (or sliced if you wanted) cheese in the wells of the bread....


    ...and then the very hot meatballs on top!! Of course you add more cheese, then pop into the over for about 15 minutes to melt the cheese really good and crisp the bread a little!


    I really wish I could show you the pictures of after they came out of the oven, but they got eaten too fast!! But I assure you, they were awesome!


    Here is the recipe for home made meatballs (Lean version is after the " / " ):


    1 pound ground beef  / 1 pound lean ground Turkey                                                                    

     
    1/2 pound ground pork (I use spicy pork/sausage)  / 1/2 lb lean ground pork/sasuage                                        

                    
    2 cloves garlic, minced                                                    


    1 cup freshly grated Romano cheese  / low-fat or light Romano                                             

                          
    1 1/2 tablespoons chopped Italian flat leaf parsley


    salt and ground black pepper to taste                                                    


    2 cups stale Italian bread, crumbled                                                     

                         
    1 1/2 cups lukewarm water                                                    


    1 cup olive oil
     
     
    1. mix the beef and pork in a large bowl. Add garlic, eggs, cheese, parsley, salt and pepper.

    2. Blend bread crumbs into meat mixture. Slowly add the water 1/2 cup at a time. The mixture should be very moist but still hold its shape if rolled into meatballs. Its okay if you don't use all the water -
    3. Shape into meatballs.
    4. Heat olive oil in a large skillet. Fry meatballs about 10-15 at a time. When they are dark brown and a little crisp, take off heat and put on a paper towel.
      • If they seem like they are too moist, or too loose (falling apart), cover when you cook them so it holds shape better.
    5. Follow steps above for assembly and use low-fat or fat free mozzarella for the topping  


    Friday, October 11, 2013

    DIY - ChalkBoard on a Silver Tray


    I have been debating what to do with Chalkboard paint and on what to make a chalkboard. I was going to use this mirror thing I had, but it had a white boarder and besides the kids room, I really don't have a place for it.

    I had found a few silver trays last week and have used them for various projects and thought I would try a silver tray with the chalkboard paint.


    I used blue tape to tape off the edges of the tray, and I found this more difficult than I thought it would be, because of the scroll edges :-/ it took a lot of strips of blue tape to curve those edges lol


    Once it was all taped off, I sprayed about 3 layers of chalkboard paint and let it dry. When it was dry completely, I gently pulled away the blue tape to expose the edges -


    I had to dig through Tori's play closet to find some chalk, but I did find some :-) My board works and I really like it - I just don't know yet where to put it...

    (Although, I am in the process of painting/striping my laundry room, so maybe I can find space for it in there?)


    Happy Crafting!!


    .


    Buffalo Ranch Tuna Cups

     Buffalo Ranch Tuna Cups So, I am not a huge tuna eater. I'm more of a steak, chicken, and seafood chick (well, aside fr...