Monday, September 9, 2013

Buffalo Chicken Dip - It's Amazing!


....Or so I am told!! :-)

I have made this once for my baby shower back in February, and since then, I have been requested to bring it to many a family functions, as well as Saturday and Sunday afternoon BBQs and now for Football season.

People don't believe me when I say it is really easy to make, so her is the reciepe for those who want a hand at making it!!

Ingredient's:


  • 2-4 large chicken breasts (depending on how many you want to serve; this is based off of an average of 3)
  • 1 cup of Ranch Dressing (or you can use light or Fat Free if you want to reduce fat/calories)
  • 1 cup of FRANKS RED HOT SAUCE ( this is a vital ingredient - I've tried other brands and it just doesn't taste the same!)
  • 1 block of Cream Cheese (again, use low-fat or reduced fat if you want)
  • 1 bag (2 c.) shredded cheddar + 1/2-1 c shredded mozzarella for top


Instructions:

  • Pre-Heat oven to 350 (its the go to temperature!)
  • Boil your chicken breasts on the stove until cooked and tender - the boiling will make the chicken really easy to shred

  • Shred the chicken with two forks or with your fingers - a few chunks are ok, but its optimal for it to be nice and shreddy!
  • Mix the cream cheese, Ranch, Hot Sauce and shredded cheese in your mixer until combined.

  • Mix in your shredded chicken.
  • Place everything into your baking dish and top with more cheese

  • Bake for about 20-25 until the cheese on top is bubbly and slightly golden brown
  • Serve in a bread bowl or other dish with slices of baguettes or chunks of other hard breads

    • *NOTE - Get more bread than you think you will need - It seems like a lot, but it is usually gone long before the dip is - worst case is you will have left over bread, but then if you do, you can make bread pudding the next day!

 
That is it - simple, delicious and I promise it will be a BIG hit!!


Tuesday, September 3, 2013

Home Made Baby Food


Those of you who know me IRL (in real life) know that my chubba bubba baby boy is an eating machine...he is almost 6 months old in September and he eats a LOT. He now has 3 teeth poked through but has been eating from a spoon since he was two months old. Considering he was born and was able to hold his head up, definitely contributes to his early developments.
 
Anyway, the pediatrician gave the go ahead at his 4 month check up to start him on stage two baby foods, (the bigger sizes, meats, etc) and to introduce juices and water, in addition to his bottles.
 
He now eats two containers of baby food, one meat combo and a veggie at lunch and dinner. Sometimes even some rice cereal too. Times this for 3-4 times a day, and the food adds up, as well as the $$$.
 
I never thought I would be the mother who *gasp* made her baby food, but seriously, doing this seems to have saved me time, energy and money. My lovely sister in law was even able to hunt down a Baby Bullet for cheap and I have to say, I love it!! 
 
So here are a few "recipes" that I have been using, as well as some tips/ideas if you want to give a hand at making your own.

 
So here are some of the combos I made over the weekend:

  • Spinach and Brown rice
  • Squash
  • Apples and oatmeal
  • Beans
  • Corn
  • Carrots
  • Chicken and beans

Once the baby gets a little older, its super easy to throw whatever you are eating for dinner into the blender and serve up to baby. I had been saving all my baby food containers that he had been eating, and used these for portions for the food I made this weekend.


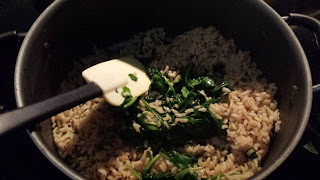
Here is the spinach and brown rice - I just barely cooked down the spinach, cooked my brown rice, tossed together and then threw into the blender.


The baby food containers stacked perfectly into gallon size Ziploc bags and slid right into the freezer. Veggies can freeze well for 2-4 months and meats 1-2 months. Heat using warm/hot water. If you microwave, be careful on hotspots and make sure it is cooled and not too hot for baby.


Also, check here at Wholesome Baby Food  site - this has a lot of info on stages, food ideas, and at what age baby is ready for solids.


******Remember, always consult with your pediatrician regarding introducing solid foods to your baby and specifically discuss any foods that may pose allergy risks for your baby.*****


DIY Drink Coasters

I hope everyone had a great Labor Day Weekend!! I was really excited to have an extra day to do stuff around my house, and I did manage to get a few projects done!! Here is one that I finished last night once the little one finally went to sleep...


MOD PODGE COASTERS


These were so easy and quick, I could have made a ton more if I had bought more tiles from Lowes earlier in the weekend....But here is a quick tutorial:


SUPPLY LIST:
  • Plain white tiles -I got mine at Lowes for  .16 cents each!!
  • Mod Podge
  • Craft paper, scrapbook paper or any other types of paper
  • Scissors or a small paper cutter
  • foam craft brush
  • Clear spray sealer
  • Felt (for the backing)
  • Hot Glue Gun


1. I have BOXES of scrap booking paper from when I was really into the scrapbooking craze a few years ago...I keep it around for random projects or for when my daughter wants to do paper and sticker crafts. I choose a few pages of really pretty paper I had, but never used. It was "too nice" for Victoria to color on and "too pretty" to use elsewhere. So I finally had an excuse to put them to use!

 
2. I found that 1 large 12x12 page will do 4 tiles/coaster. Depending on your pattern, you may not be able to save much of the page after cutting, but you never know. The page I used above had a nice square picture pattern, so I made sure a center picture was in the middle of my tile.


3. Cover your tile with a generous amount of Mod, and center your paper on it. I cut my squares just a little shy of the edges to let some of the white from the tile show, but do what makes you happy :-)


4. Put a coat of Mod over the paper once its on the tile and let dry, about 15-20 minutes. I did two coats of mod and then my clear spray sealant.

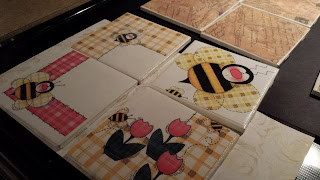
Below are some pictures of the 3 sets of 4 that I did last night:


5. When your Mod Podge is dry and your sealer dry, cut your felt to size and break out the glue gun. I have seen various ways of doing this, including "stuffing" a few cotton balls inside the felt to give it a little more stability. Its up to you.


6. If you plan on giving these as gifts, it looks really pretty wrapped in tissue paper and tied with an organza ribbon and a hand written tag. These can be made in 4,6, 8 or more groupings. I have seen some use napkins, wrapping paper, newspaper, book pages etc. so it really is up to you and your imagination!!

Random Photo: My kitty attacking my drawer of scrapbooking paper...He gets into EVERYTHING! He almost Mod Podged his paws...


HAVE FUN!!


Friday, August 30, 2013

Family Packing for Vacation (Or OCD packing as I call it)


With a 5 year old and a new baby, the thought of taking a Family Vacation To The Beach seemed both thrilling and challenging at the same time. As it is, I'm one of those "extreme over planners" and "Extreme Over packers" - Otherwise known to my family as the one with OCD :-)

For this particular trip I actually started my "Packing List For The Beach" (and yes, my word document, check off list had a title!) about two weeks in advance. I wanted to make sure that we wouldn't have to run out and pick up an item we forgot, when it would probably cost twice as much and we would need only a little.

In addition to the "Packing List For The Beach" (Which I will include at the bottom) I also remember seeing an idea online somewhere (pintrest most likely) about packing individual outfits into gallon size Ziploc bags.

This. Is. Genius.

We were going to be going for 5 days so I allotted 1 outfit per day (including socks and undies) for my 5 year old, and packed one additional Ziploc with an extra 2 bottoms and 2 tops (just in case). For my baby, I packed 2 whole outfits per day and a separate bag with onsies and sleepers.

The great thing about this idea is that by pre-planning and packing the clothes, I would not have to do the "dump and search" when trying to get them dressed in the morning. Not only that, but my daughter could pick from her bags and then dress herself. It was a win win as far as I was concerned. But, the GREATEST thing about this idea, is at the end of the day, the dirty clothes go right back into a Ziploc!!! No smelly clothes or food stains transferring to other clothes.

And I really did have fun planning all the outfits for the kiddies!


Here is a bad picture of what my packed suitcase looked like:


In addition to the kids clothes, mine fit in with theirs, meaning that I did not have to tote around 3 different suitcases with us. My husband packs light and only needed his small overnight bag.

I also packed separate bags for shower/bathroom stuff, and a small bag for meds, sunscreen, aloe etc.

Anyway, I am pleased to say, that we did not need to buy one additional item while on our trip. I obviously contribute this to my genius list writing skills, but my husband just thinks its because I had too much time on my hands :-)
Packing List For The Beach
Older Children - Clothing
q 5 full outfits, undies, socks, sweater
q 2 pairs shoes
q Bathing suit, cover up
q 2 pairs PJs
q Color book/crayons/Markers (other car travel items or rainy day items)
Younger Children/Babies - Clothing and Accessories

q 10 outfits, onsies, bathing suit, sweater

q Diapers, wipes, Baby shampoo, washcloths

q Bottles, tops, caps

q Formula, baby food, spoons

q Highchair, pack & play, swing, playmat

q   Stroller

q Pacifiers, blankets, bibs

Dad:
q 5 outfits, boxers, socks etc
q 1 nice shirt/bottom for night out
q flip flops
q Bathing suit
q sweater/hoodie
Mom :
q 5 outfits, socks, undies, etc
q 1 nice outfit/dress for night out
q flip flops
q bathing suit, wrap
q sweater/hoodie

Beach Items


q Chairs

q Beach toys

q Blanket/ Towels

q Baby Powder (BTW, this is AMAZING at removing sand after leaving the beach! Just puff it on, rub in and off falls the sand!)

q Sunscreen

q Life Jackets

q Sunglasses

Personal Care
q Makeup, tweezers, Q-tips, perfume                  
q  Thermometer, Aloe Vera Gel
q Body wash/ pouf, Shampoo/conditioner, face scrub
q Razor, deodorant, shaving cream,
q Hairbrush, hair ties, Hairspray
q Motrin/Tylenol/sleeping aid/ decongestant, indigestion med
q Contact lenses/solution/glasses
q Mouthwash, toothbrush, toothpaste


Electronics:

q Kinect Game system

q Hard drive/movie drive

q Laptop/Charger

q Kindle/ Charger

q IPad/ charger

q Camera / Charger

q Ipod, earphones


Beach House accessories: (If you are renting a house and need linens)

q 2 sets Queen Sheets

q Extra Pillows

q Playing Cards/Phase 10 Cards


Thursday, August 29, 2013

Chicken Braid Extraordinaire


The Chicken braid is one of the easiest "go to meals" in my house. Its one of those meals that you can literally make out of anything you have in your refrigerator. I usually make mine using chicken, but I have used beef, steak and have even made a veggie version for the nights we pretended to be vegetarians.


The picture above is the Easy Way. But by all means, feel free to do it the SHW if you so desire (and the SHW is making your own dough).
 
Ingredients for this particular braid:
 
  • 2 cans of crescent rolls (Any kind works, but the Butter Flavor is particularly tasty!)
  • 2 chicken breasts, seasoned, cooked and either chopped or shredded
  • 1c. shredded motz cheese or cheddar (or whatever you have in your fridge - you can even use sliced)
  • 1 crushed clove of garlic (I cook mine in with the chicken)
  • 1 bag of double washed spinach (I keep mine raw and just mix it in before filling - the hot cooked chicken will be enough to wilt it down and it will be cooked additionally in the oven)
  • 1 microwaved bag of broccoli florets
  • 1/4c. mayo (or you could ranch if you wanted)
  • Salt and pepper to taste (I usually throw in 1 or 2 other seasonings - whatever I happen to reach first in my spice cabinet)
 
Optional fillers and tasty additions:
  • Broccoli
  • onion
  • sausage
  • peppers
  • mushrooms
  • Bacon (cause, everyone loves bacon!)
  • Cranberries
  • almonds
  • asparagus (Make sure this is fully cooked and soft before chopping and using)
 
  • Pre-Heat Oven to 350 degrees (this is my usual go-to temperature). While heating, cook chicken breast with your garlic until pieces are JUST cooked and no longer pink.
  • In a large mixing bowl, combine the chicken, spinach, mayo and cheese until everything comes together. Set aside.
  • Open your cans of crescent rolls and "unroll" the pieces. Place the long flat end (the bottom of the triangle) on a lightly greased tray with the point going to the side. With your next piece, place it slightly overlapping the long side of the previous piece, so that the point is facing in the other direction.
  • Do the same thing directly below, slightly overlapping the upper piece. Do this with all the pieces of crescent roll dough.
  • Press gently down the middle, slightly flattening the dough (this is where your yummy filling is going), so that when baked, the braid wont fall apart when you cut it.
  • Scoop the filling and put it along the center of the dough, trying to keep stray pieces from falling onto the pan.
  • Starting at the top, begin "braiding" the tail ends of the dough, cris-crossing or twisting the dough and pressing it lightly into the other side. I find that slightly folding the top up and over before starting the braid, helps keep in some of the filling.
  • Continue braiding all the way down, tucking the end in.
  • Bake at 350 for about 15-20 minutes until the crescent rolls puff and get golden brown.
  • Pull out, let cool for a few minutes and cut and serve. I usually pair my braid with a past salad, green salad or whatever vegetable I have on hand.


You can also make this a breakfast braid, by scrambling up some eggs, adding in some onions and peppers, sausage etc and do the same way. Try it with the Honey flavored rolls - gives it a nice sweet and savory combo!!


Kit Kat Kake

Like I said in my previous post, my husband loves anything with peanut butter. So for his birthday in January, I wanted to do something "different" then a regular cake he would expect. I randomly found some pictures of a Kit Kat cake when I was searching online for "Man Cakes" (This was a visually interesting search, BTW!) and found it. I thought it would be a perfect choice for him, and I knew I could incorporate the peanut butter somehow!!


There is, as always, two ways to do this cake:

The Easy Way
The Suzy Homemaker Way

For this particular cake, I went the SHW, and baked my own cake (my version of "funfetti") and made my own buttercream icing. Because I wasn't doing any icing work, I kept the consistency pretty sturdy because I was going to be attaching these Kit Kats.

For the Easy Way, purchase your premade and pre-iced cake from your favorite retailer or grocery store.

Tools/Ingredients:

  • Cake (if baked or bought)
  • Icing (if home made, bought, or pre-iced)
  • 10 packs minimum of REGULAR sized Kit Kat Bars - each package contains 4 bars, This cake (9inch) took 40 bars. I would buy a few extra packs just in case some break or you eat some as you go (I could not resist, personally!)
    • ***NOTE - put these in the freezer for an hour or so before you use them - they melt pretty quickly, and this will prevent fingerprints in the chocolate
  • 1-2 LARGE bags of "topping"
    • In this case, I used Peanut Butter M&Ms - however, you can use crushed Oreos, jelly beans, Coconut, fruit etc etc...the possibilities are endless!!
  • A cake topper if you want one - I purchased this one at the dollar store, although it is supposed to be a table topper, it worked just as well for the cake.
  • Ribbon of any color or to coordinate with your topping


  1. 1. Put together your cake (if its the SHW), ice between layers and all sides - your frosting does not need to be perfect, because the Kit Kats will cover it
  2. Break open your Kit Kat bars, a few at a time, and leave the rest in the freezer while you work. I broke my bars down to have 2 pieces of 2 bars (this helps with the rounding)
  3. Starting wherever you want, gently press the bars into the frosting, making sure that the bars are touching your base (cake plate, cake stand, box - whatever) to keep it nice and neat. a two stack should give you about an inch-ish or so above the cake (where your topping will go)
  4. Tie your ribbon however you want, making the bow where you want your "front" to be.
  5. Open up your topping and start filling in the top of the cake where the Kit Kats are standing up. (if you are using a topper, put this on first and pile on top). For my cake, I also placed some around the corners of my square cake stand.
  6. Ta-Da! Your Kit Kat Kake is done!

I co-conspired with my sister in law and mother in law to show up at hubby's work, and took the cake to share. This cake is VERY sweet and really is only good in small amounts. The two bar Kit Kats around the edge was great for a cutting guide. However, you can probably mix up some flavors to create a sweet and savory cake if you found a good combo.


Wednesday, August 28, 2013

4th of July Party Fun!


Here is a quick rewind to look at at some of my 4th of July yummys I made this year for our 4th of July Party.  I decided to do all the desserts for this party, so this is going to me a "sweet" post :-)


TOP LEFT:

4th of July Triffle dessert -
  • I got 2 pound cakes (you can use angel food as well; I bought mine from the store, but you can bake these as well), sliced them into what looked like slices of bread, and used my star cookie cutter and cut out the stars. Save the scraps, because you can use this as a filler in the middle.
  • I used white chocolate pudding and whipped cream that was thawed out (You can make your own if you want to get technical with it), and used blackberries and raspberries as my red and blue.
  • I placed the stars around the outside of the dish and began filling the center in layers of pudding, berries and whipped cream as well as the extra pieces of pound cake. The flavors were amazing!

TOP RIGHT:

4th of July Oreo pops -

  • I used the Birthday Bash flavored oreos (but you can use any kind). I melted my white chocolate down in a small batch (this is a two step/freezer process) and with my pop stick, twirled it in the chocolate and placed it on the inside of the opened oreo, gently pressing into the oreo crème, and replacing the other side - make sure you have enough chocolate on the stick to hold the other end on.
  • Place pops on a sheet or plate and put in freezer for a min of 30 minutes, longer if you can.
  • Once the pops are set, melt down your batch of chocolate for dipping and gently place oreo in, swirl and gently tap on the edge of dish to remove excess. I placed mine directly into my pop holder, but on wax paper laying flat is fine to.
  • While the chocolate is still wet, add sprinkles, candies or whatnot to spice them up. I used sugar crystals in blue and red. Place back into freezer to set and firm

BOTTOM:
 
Table scape -
  • Here you can see some of the table scape of my oreo pops. To add a little something else, I had an empty glass cylinder I filled with minty blue and white candy bites.
  • There is also a Funfetti America Cake in the background (at the request of the Hubby) and instead of using the frosting to actually "frost", I warmed it up to thin it out, added some food color and drizzled it on. I added the enclosed star shaped sprinkles for some bling.


In the below picture is a few more of my table scape (Which needs much improving, but I got lazy by the time the party started).

Shown in the bottom half of this photo, is my layered jello desserts with red and blue jello and whipped cream on top.
 
 
In this picture below, I did a white chocolate covered strawberry then dipped in small grain blue sugar. This, ironically, was the most annoying dish to make, as I only used my fingers, and I kept dropping whole strawberries into the chocolate and there is really no way to stand them up to "dry", so most of my strawberries had flat backs from being placed onto the was paper after dipping.
 
Oh well - these were the first to go anyway!
 
In the second half of the photo is my red white and blue fizzy drink, which is just plain sprite with red and blue tinted, star shaped ice cubes. I found these trays at the dollar store and really loved how they looked...
 
**NOTE: Make sure your sprite is really really cold when you make this and wait to add your ice cubes until the last minute - by the end of the day (or whenever it gets warm enough to start melting the ice cubes), the fizzy drink will turn purple - which the kids actually really liked :-)

 
ENJOY THE HOLIDAY!!

Buffalo Ranch Tuna Cups

 Buffalo Ranch Tuna Cups So, I am not a huge tuna eater. I'm more of a steak, chicken, and seafood chick (well, aside fr...