Monday, October 14, 2013

Lean Turkey (Ball) Subs!!


There are two ways to do these:

The SHM (Suzie homemaker way)
The Easy Way

I won't hate you for doing either!!


For these (I won't lie!) I did it The Easy way and used bagged Turkey Balls (why does that sound so dirty??) that were low in fat and calories - combined with a reduced salt jarred sauce, low-fat shredded cheese and whole grain rolls, these could be considered healthy (But I'm not a dietician and I have no idea the caloric count - but I assume its better than the regular beef meatballs).


For those who want to do it the SHM way, here is a GREAT meatball recipe I've used in the past and tastes fantastic! (this is posted at the bottom!).

Anyway, for these shown above, I opened the bag of frozen Turkey Balls and put them in a medium sauce pan with my yummy spicy tomato sauce, and simmered on low for about 2 hours - I really wanted the good flavors to get into the meatballs!


When the meatballs were about done, I preheated my oven to about 350, and got out my rolls - I usually get the rolls that ARE NOT PRECUT because I like to hollow them out like a log ship -


...This helps the meatballs not fall out, keeps the sauce in and the melty cheese I add in doesn't seep out!!

Then I put a bunch of shredded (or sliced if you wanted) cheese in the wells of the bread....


...and then the very hot meatballs on top!! Of course you add more cheese, then pop into the over for about 15 minutes to melt the cheese really good and crisp the bread a little!


I really wish I could show you the pictures of after they came out of the oven, but they got eaten too fast!! But I assure you, they were awesome!


Here is the recipe for home made meatballs (Lean version is after the " / " ):


1 pound ground beef  / 1 pound lean ground Turkey                                                                    

 
1/2 pound ground pork (I use spicy pork/sausage)  / 1/2 lb lean ground pork/sasuage                                        

                
2 cloves garlic, minced                                                    


1 cup freshly grated Romano cheese  / low-fat or light Romano                                             

                      
1 1/2 tablespoons chopped Italian flat leaf parsley


salt and ground black pepper to taste                                                    


2 cups stale Italian bread, crumbled                                                     

                     
1 1/2 cups lukewarm water                                                    


1 cup olive oil
 
 
  1. mix the beef and pork in a large bowl. Add garlic, eggs, cheese, parsley, salt and pepper.

  2. Blend bread crumbs into meat mixture. Slowly add the water 1/2 cup at a time. The mixture should be very moist but still hold its shape if rolled into meatballs. Its okay if you don't use all the water -
  3. Shape into meatballs.
  4. Heat olive oil in a large skillet. Fry meatballs about 10-15 at a time. When they are dark brown and a little crisp, take off heat and put on a paper towel.
    • If they seem like they are too moist, or too loose (falling apart), cover when you cook them so it holds shape better.
  5. Follow steps above for assembly and use low-fat or fat free mozzarella for the topping  


Friday, October 11, 2013

DIY - ChalkBoard on a Silver Tray


I have been debating what to do with Chalkboard paint and on what to make a chalkboard. I was going to use this mirror thing I had, but it had a white boarder and besides the kids room, I really don't have a place for it.

I had found a few silver trays last week and have used them for various projects and thought I would try a silver tray with the chalkboard paint.


I used blue tape to tape off the edges of the tray, and I found this more difficult than I thought it would be, because of the scroll edges :-/ it took a lot of strips of blue tape to curve those edges lol


Once it was all taped off, I sprayed about 3 layers of chalkboard paint and let it dry. When it was dry completely, I gently pulled away the blue tape to expose the edges -


I had to dig through Tori's play closet to find some chalk, but I did find some :-) My board works and I really like it - I just don't know yet where to put it...

(Although, I am in the process of painting/striping my laundry room, so maybe I can find space for it in there?)


Happy Crafting!!


.


Friday, October 4, 2013

Rehab to Fab - Old Candle Sticks and Glass Jars


I am super excited about this DIY rehab to Fab I did last night!!

$3.00 total - 2 old glass candle holders and 2 glass jars with lids.


I first spray painted the bases....


Then I tried to figure out how to put my glitter on...I first taped off the glass so that only exposed the part I wanted to be glittered...


I thought it made sense to spray the glass with adhesive and then put it into a baggy with glitter..


...this did not work so well :=/


And I just ended up with a big old mess. I had to wash it off and start again...
 
So I just sprayed the adhesive and then sprinkled the glitter on over a bowl.


After I got the glitter all over, I sprayed a clear coat of spray to seal in the glitter and then removed the tape..


Once everything was dry and set, I began to assemble...


I hot glued the base of the glass jar to the candle stick, and pressed gently in to set it firm...


when those were dry, I found some red scrap ribbon and tied it around the top!!


I love these because even though I plan on using these for Christmas, these can be used as tea lite holders, candy holder or anything else...I just really love love love the glitter!!! I've been dying to do something with glitter and this def. hit the craving!

Enjoy, and Happy Crafting!!


Thursday, October 3, 2013

Baby Print Ink Kit - DIY and then some!


So, I had a friend direct me to this website that you can sign up for and depending on what kind of blog you have or what your "niche" target audience is, companies send you products for you to review (for free!!) and then you blog about the product, linking back to their site or order form.

I thought that these type of things are gimmicks to get your email address and gets you sent thousands of emails for junk.

However, I did actually get "approved" for a product to review, and actually got it!!

So, here it is:


This is a Baby Safe Ink Print Kit (basic). It shipped from Amazon.com( Click here to see the product and to order - its also avaib. for prime members, so shipping is free if you use prime!). It came in a sturdy envelope and I was super excited to use it, and I opened it right away.


These are the Ink Pads, which I really liked, because they were easy to split up (you get "4" pads), and I was kind of afraid of some of the reviews I read that stated they were "cheap" and did not cover a lot etc.

I didn't think that at all! I think that those people didn't move the pad around to get the full surface area - I did this and found that it MORE than covered both hands and feet and had some left over!


Here are the prints I made - I used my own paper (These will become coasters!) and I really loved the detail they made. The kit did come with really heavy white cardstock, but I love stuff with a little flair, so it would have been nice to have a few backgrounds to  choose from. Maybe double sided with different themes or patterns to choose from?


Anyway, it was easy to do, even with a squirmy 6 month old, but the prints came out great! The only thing about this kit that I think needs some improving is the wipes - it is awesome that they are included, but they either need to include more wipes or thicker/larger wipes (especially since the kit states can be used over and over). And I for sure think that it would make than the 6-10 it says it would :-)

The picture above show their two wipes included (to the left) and then my baby wipes (to the right). You can see that they all are pretty well covered in the ink (for both hands and feet) but it did take additional wipes than the ones they had in the kit.

I do love the fact that their wipes had a kind of soapy feel, which attributed to the ink coming off so easily on the hands/feet. My wipes didn't work that well, but between them, I got it all off.


I received one or more of the products mentioned above for free using <a href="http://www.tomoson.com/?code=BOTTOM4e667e6c4656729097f892a9e2b360cd" rel="nofollow">Tomoson.com</a>. Regardless, I only recommend products or services I use personally and believe will be good for my readers.

Wednesday, October 2, 2013

DIY - double teir silver tray server/sorter


Here is a simple easy DIY for today -

  • Silver trays from thrift store
  • candle stick from thrift store
  • silver spray paint from Lowes
  • Hot Glue gun


  • Spray paint the candle stick until completely dry
  • hot glue base of candle stick to the top of your tray
  • hot glue candle stick to bottom of your top tray


Take a mess like this: (this is real - not a staged photo - ask my hubby!)


And use your new two tier trays for this:


Its pretty awesome for its use, however, I don't know if it makes it really any more or less "easier" or "cleaner" lol...I think I might end up using this on my dessert table during the holidays or if I keep it in the bathroom, just put some pretty soaps, potpourri and candles instead.

Happy Crafting!!

DIY - Subway Art in frames and Modge poge!


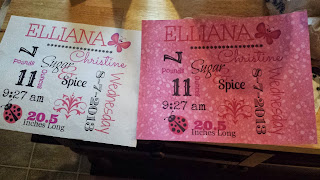
I fell in love with "subway art" recently, after seeing some really cool variations online on yahoo and on Pintrest. I really wanted to do this, but could not find ANY links to really good sites that help create these.

You could use Microsoft word, but it was a LOT of work and became too tedious to be fun. I scoured blogs and search engines, hoping that someone had found a good and WORKABLE link to a site that made making subway art easy.

I did finally find it at PICMONKEY and by far, this is a GREAT site to create these subway art pieces.

A few drawbacks to know:

  • You can not "save" mid creation, if you don't have the "royale" membership - I do not know the cost, I always just clicked ignore - if its not expensive and you want the option, by all means, go for it.
  • Some items are only good with Royale membership (pics, clipart etc)
  • you can not "reopen" a saved file to continue editing - you need to either finish or throw it away.


Anyway, here is how I made mine: -)

  • I printed out my files on some scrapbook paper

  • I did two of these, one for my son and one for a friends new baby. I did Jacks on a wooden plaque that I picked up at a thrift store and painted over, and my friends I put in a frame, (also found at the thrift store) and I spray painted it pink.
  • Here is the plaque I painted over with blue, before putting on the Subway art.


  • Once the paint was dry all the way, I put on a thin layer of Mod and positioned my page. My page was an 8.5x11 but the wooden piece I was using was just a little bigger, but because I painted it, the blue showed through nicely.


  • After I pressed in the page, I rubbed gently with my finger to get out any air bubbles and smoothed the page as best I could without tearing it - so just be gentle. After all the bubbles were out, I slathered on another thin layer of Mod!


  • See how nice and shiny the mod podge makes everything??


  • Then, just let the mod podge dry and your done!

  • Here it is on the wall :-) I really really love it!


  • For my friends baby, (who had a girl) I did hers in a glass frame. This frame I bought at the thrift store and spray painted a pretty pale pink color - this is the after...I just wish I had taken a before photo to show you how really well things polish up with a little spray paint :-)


  • I printed her Subway art out on two different pages, but she liked the one printed on white first, so I went with that one.


  • This was easier to do since it was just going in a frame, but I LOVED the way it looked (espec. on the embellished paper I used!)


And there you go! An easy peasy subway art tutorial!!


Happy Crafting!!


Buffalo Ranch Tuna Cups

 Buffalo Ranch Tuna Cups So, I am not a huge tuna eater. I'm more of a steak, chicken, and seafood chick (well, aside fr...